
|
|
|
|
| |||||||||||||
|
When I started playing with muzzleloaders as a teenager, there really wasn't anyone in my circle of acquaintances who did it so there wasn't anyone to ask questions of. That meant a lot of trial and error and research into how things were done 200+ years ago when flintlocks were the current technology. People often ask me if there is a good book or video about it, but I haven't found one yet that really works for the beginner and has historically correct, safe information in it. For a while, we carried a video that claimed to teach the basics of muzzleloading, but it was so boring that even a nerd like myself couldn't stay awake through the whole thing. Someday, I'll make a video or a series of them and put them on youtube, but the lack of enough hours in the day keeps pushing that project to the back burner. For now, you will have to settle for my web article that follows below.
Let's take a look at what a musket is and how it works, then we will take a look at what sort of stuff we need to load, fire, and clean one. First, a quick history of the various types of muzzleloaders that you may encounter. A muzzleloader is basically a length of tubing that is plugged at one end. In the side of the barrel is a small hole, called the vent, into which you introduce a spark to ignite the powder in the barrel. The earliest guns were just that and nothing more...a tube with a plugged end and a vent hole. We know that type of gun today as a "handgonne" and some of the designs go back to the medieval era. Here is a picture of a handgonne replica. The hook on the bottom is to interface with a forked stick called a rest to facilitate aiming and also allows the thing to be swung like a club when the enemy overruns your position. Click on the photos to enlarge them, use your browser's 'back' button to return:
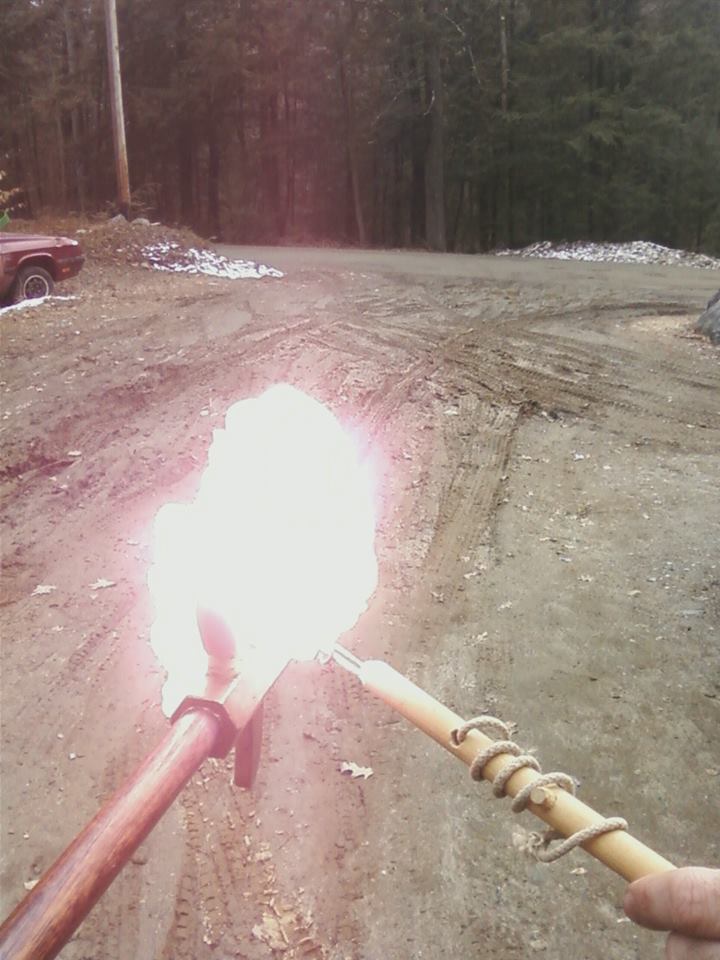
To fire a handgonne, you load it with powder and a projectile, fill the vent with priming powder, and touch it off with a linstock (a stick that holds a burning piece of rope) or a red-hot poker. This whole process took a lot of fumbling, and more hands than most people have. Here is a photo of the handgonne being fired (with a blank charge, we also fire round ball out of it) without a rest.
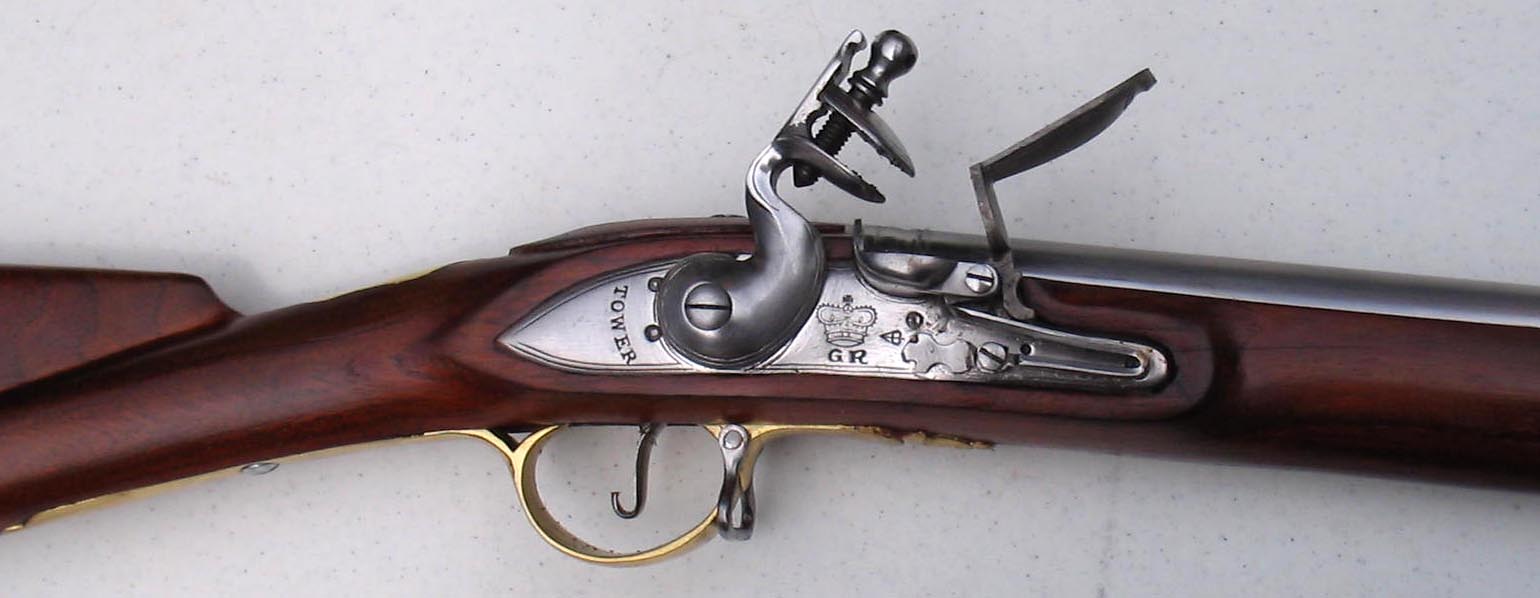
The next step in the evolution of the gun was to add some sort of mechanism to the side of it that would hold the burning matchcord for you and maneuver it into place to fire the piece when you wanted it to go bang. The logical first step here is the matchlock. This is a matchlock musket. Yes, this is the sort of thing that came to America to places like Jamestown and Plimoth Plantation.
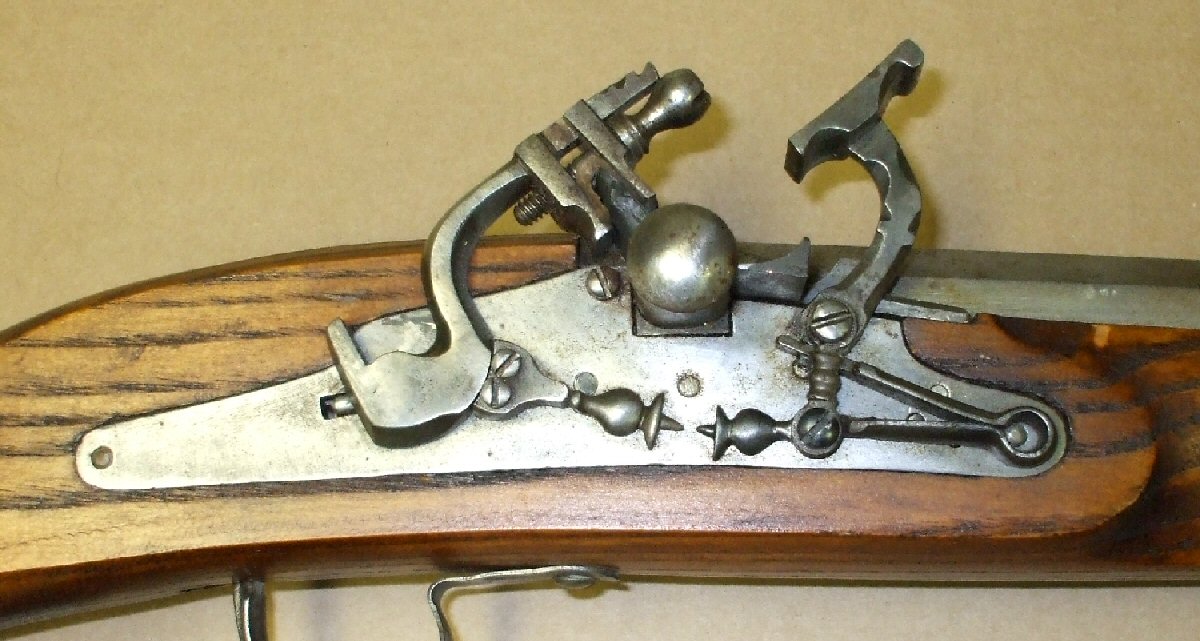
While this type of matchlock may be primitive in comparison to a flintlock, they were in common use from the 1500's up through the mid to late 17th century. The upside to a matchlock is that there aren't a whole lot of moving parts to deal with, but the downside is that they are a bit finicky about weather conditions because you need to keep that match lit. You also couldn't have the gun loaded and ready to grab sitting on it's pegs over the door the same way you could a flinter because you'd have to fumble with flint and steel in order to get the match lit. In certain tactical conditions a matchlock is just fine, but on the American frontier, we needed something more reliable that you could leave loaded and ready to use instantly. Inventors were developing gunlocks throughout the 17th and 18th centuries, some complex, some simple. Wheellocks, miqulet locks, and snaphaunces all show up in this time period. I'll add photos and info about them in a later revision to this page. This is a snaphaunce lock. It is the earliest type of flintlock. The word snaphaunce has Dutch origins and roughly means "pecking cock" because the jaw which hold the flint look somewhat like a pecking rooster when it swings forward to strike the battery (frizzen). The snaphaunce is a very complex piece of machinery! One of the over complicated features of a snaphaunce is that there is a separate pan cover and battery. When the lock is snapped, as the cok and tumbler rotate forward, there is a rod which is pushed against a lever which in turn shoves the sliding pan cover out of the way just as the flint strikes the battery to create a spark.
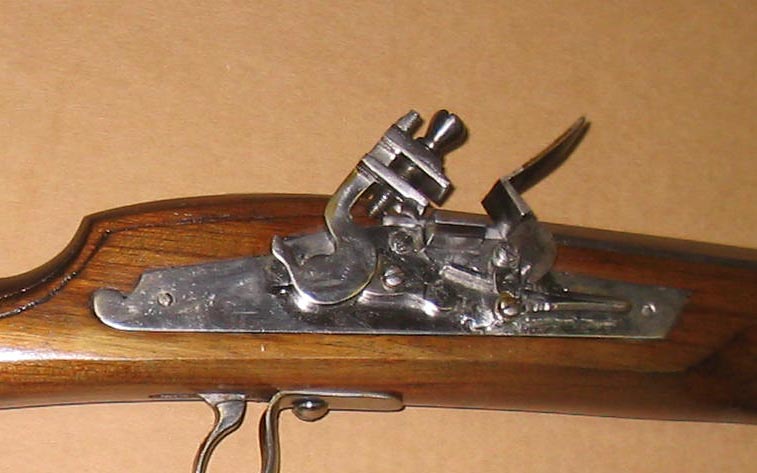
Somewhere along the line in the early 1600's, some English gunsmith must have thought there were just too many moving parts to a snaphaunce, so he got rid of the rod, lever, pan cover and separate battery and replaced all of that stuff with one piece: the frizzen. The resulting lock is known as an English lock. One problem that arose from converting old snaphaunces to English locks is that snaphaunces didn't have a half cock notch. It wasn't needed because you could carry it loaded safely by just flipping the battery forward out of the way so a spark couldn't be struck off of it if the gun were to accidentally be fired. To get around this problem, later English locks had a dog-catch installed to act as a safety or more accurately, a half-cock position. These two photos show a replica English lock that has been converted from a snaphaunce so there is no external dog catch, and a slightly later styled English lock replica that has a dog catch so it would also be correct to call it a 'middle doglock'.
The Dutch streamlined how a lock works early in the 17th century, but it was the French who came up with the flintlock as we know it today. The major improvement was the orientation of the sear inside the lock. For now, let's keep things simple and just say that the French came up with the vertical acting sear which replaced the earlier horizontally acting sear and call it a day. The minute details of what all of that means might be a good topic for a future article...but would probably bore 99% of you to tears so I'll skip it for now.
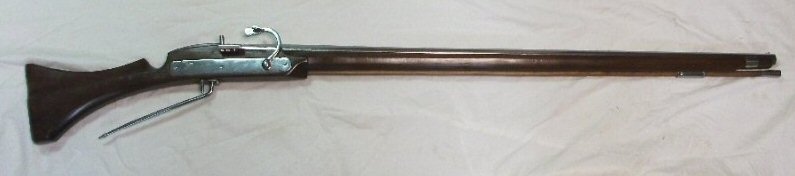
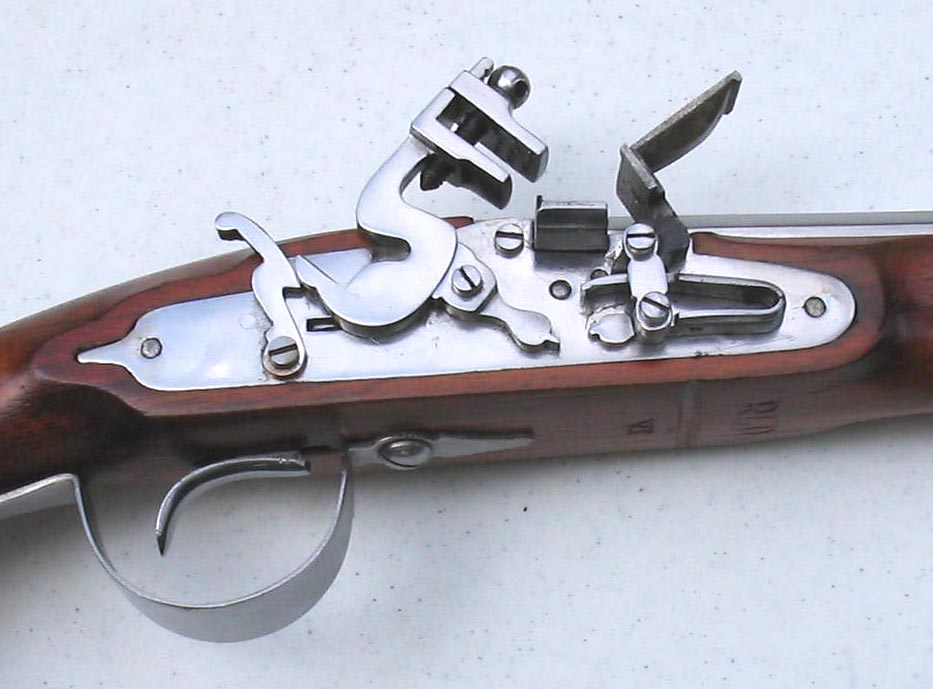
This is the lock of a 1756 Pattern Long Land Musket. This is our best selling musket and is what most people think of when asked about what kind of gun was used in the 18th century.
Later on, as time allows, I'll rework this page to continue the story of firearms evolution up through the percussion era, but for tonight I'm going to move on to the care and feeding of a flintlock. The first thing you will need to shoot a flintlock is black powder. A flinter doesn't create a hot enough spark to ignite most of the black powder substitutes that are around, so don't invite frustration into your life by attempting to use a substitute, even if the salesman at your local gun shop tries to sell you some. Real black powder is getting harder to find these days because most deer hunters now just use an inline muzzleloader {{{gag}}} instead of taking the time to learn how to shoot a traditional smoke pole.
The most common black powder manufacturer is Goex and it comes in various granulations. The common graduations are 1f (for small cannons and larger bored small arms), 2f for guns .50 cal and over, 3f for guns up to .50 cal, and 4f for priming the tiny pans of longrifles. You'll see it written different ways: 3f is the same as saying FFFg and so on. Regardless of what people will tell you, especially reenactors, do not use FFFg powder in a full sized musket. If it is over .50 caliber, use FFg!!! The smaller the powder granulations are, the faster it burns and the higher the chamber pressures. There is no need to carry a separate priming horn with a military musket as they use the same powder in the pan as in the barrel so you have no need to spend another $18 on a pound of FFFFg priming powder.
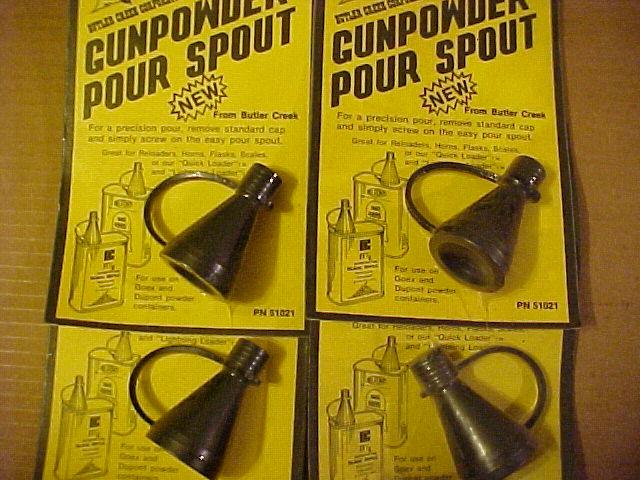
A pound of powder weighs 7000 grains. The service load in a Brown Bess is 75 grains plus probably 10 or 15 more for priming the pan, so in theory you should get around 75 shots per pound of powder, depending on how much you spill. At $18 per pound on average, that puts it at around $.24 per shot, which is like shooting cheap military surplus ammo or Wolf brand 9mm if you look at your cost per shot so these things are relatively cheap to shoot if you cast your own lead bullets. In movies, you'll see the hero running along, dumping powder directly from his horn into the muzzle of the gun. Never, ever do that! First off, you need to actually measure the powder and while counting and pouring as you run like Hawkeye did in Last of the Mohicans might seem all folksy, it is shockingly stupid. (I'm struggling hard to resist the temptation to go off on a tangent about how a frontier trash woodsman in upstate NY wouldn't have had a longrifle, he would have had a smoothbored musket...but I won't) What happens to that pound of gunpowder in your hand if there is a spark lingering from the last shot in the barrel? That much powder would cripple you if it were to ignite. I guess I have gotten ahead of myself here. What will you carry your powder in? Flasks are handy, but aren't correct to the 18th century. Really, if you want to be authentic to the 18th century, there are two ways to do it. One is to carry powder in a horn, balls in a bag or pouch, and load them using cloth patches. The other is to carry prerolled paper cartridges in a cartridge box like the military did. If using cartridges, you'll probably want one of the little screw-on spout things that convert the 1lb can of powder into a flask so you can easily pour the powder into your measure. Here is a picture of what I'm talking about, you can probably find one at your local gun shop where you bought your powder.
Using this spout, you can fill your measure at the shooting bench or while making cartridges and it will keep you from having to spend money on a modern-looking flask. I'm not saying the modern flasks are a bad thing, just that they aren't authentic to the period of the musket itself, and if you are going to spend hundreds of dollars on an authentic gun, why not go all the way and use a horn. That being said, if you DO decide to use a horn, you'll need a tiny little funnel to fill it.
(pictures of horns, flasks and funnels & links to follow)
A sheet of instructions on how to make musket cartridges comes with every long gun we sell as well as an owner's manual. I suppose cartridge making should be the topic of a whole other article.
Let's move on to powder measures. There are lots of ways to fill that need, some period-correct, some modern. I use both, depending on what mood I am in. It is fun to have an authentic powder measure, but a good adjustable authentic styled measure is hard to find. Folks who have only one or two muzzleloaders will usually have a single, non-adjustable powder measure for each gun if they are different calibers. Me, I have more muzzleloaders than you can shake a stick at (not sure why you'd want to shake a stick at them, but to each his own I guess) and an adjustable measure really comes in handy. It also is handy when you are sighting the gun in and working up just the right load. If you can find an authentic styled adjustable powder measure, grab it. If not, some of the modern ones are pretty cool with little swivel funnels to make it easier to load the gun etc.
patchesprojectiles flints & leathers tools cleaning supplies oil This page is under construction. I am working on it the evening of 9/13/16 and will continue to do so until it is finished. If you see this message and the date is after 9/15/16, use your browser's 'refresh' button to see the finished product
|